
Remembering Operation Jaywick: Singapore’s Asymmetric Warfare – Analysis
By RSIS
Decades before the concept of asymmetric warfare became popular, Singapore was already the site of a deadly Allied commando attack on Japanese assets. There are lessons to be learned from this episode.
By John Kwok*
September 26, 2018 marks the 75th anniversary of Operation Jaywick, a daring Allied commando raid to destroy Japanese ships anchored in Singapore harbour during the Second World War. Though it was only a small military operation that came under the larger Allied war effort in the Pacific, it is worth noting that the methods employed bear many similarities to what is today known as asymmetric warfare.
States and militaries often have to contend with asymmetric warfare either as part of a larger campaign or when defending against adversaries. Traditionally regarded as the strategy of the weak, it enables a weaker armed force to compensate for disparities in conventional force capabilities. Increasingly, it has been employed by non-state actors such as terrorist groups and insurgencies against the United States and its allies to great effect, as witnessed in Iraq, Afghanistan, and more recently Marawi. Operation Jaywick is a good case study that demonstrates the advantages, costs, and use of asymmetric warfare.
Z Special Unit
Operation Jaywick was carried out by a special task force called Z Special Unit that was formed in June 1942 and made up of officers and men from Australia and Britain who had escaped Singapore before its surrender.
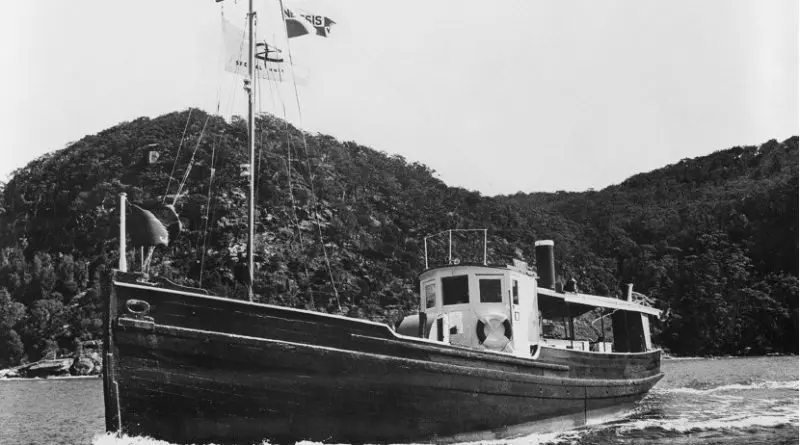
Launched on 2 September 1943, Z Special Unit commandos made their way to Singapore using a captured Japanese fishing boat that had been repurposed into a transport infiltration vessel and renamed MV Krait after a species of small venomous snake in Southeast Asia.
Using the Krait, Z Special Unit infiltrated Japanese-controlled waters around Singapore and travelled to as close as possible to the harbour before deploying commandos in three collapsible canoes. Each canoe carried two commandos who paddled the canoes into the harbour and attached mines on time-delayed charges to the hulls of target ships.
After laying the mines, the commandos paddled out to open waters to rendezvous with the Krait before escaping back to Australia. On the morning of 27 September, the mines went off, sinking or severely damaging seven Japanese ships, or some 30,000 tonnes of Japanese shipping. Z Special Unit subsequently returned to Australia safely on 19 October. From its starting point in the Exmouth Gulf in Western Australia, the raid and the round trip took 48 days.
Japanese Response
The raid had caught the Japanese completely off guard as they had up till then believed that they were safe from Allied counter-attacks in Singapore, which was well within safety of Japan’s defence parameter in the Pacific. The Japanese assumed that it was the work of local saboteurs and responded with strong policing actions on the civilian population.
On 10 October, in response to the raid, the Kempeitai, the Japanese military police, arrested 57 civilians and transported them to Kempeitai prisons in YMCA and the Central Police Station for interrogation on the suspicion of providing information that aided the raid.
The purge was led by Lieutenant-Colonel Sumida Haruzo, the Chief of the Kempeitai. Sumida and his men used brutal methods to force the suspects to confess to covertly aiding the Allies. Fifteen suspects were either tortured to death or died in captivity. Those who survived served long prison sentences at either Outram Jail or Changi Prison.
One of those who survived torture and captivity was Elizabeth Choy, now recognised as a war heroine for resisting the Japanese during captivity. This event is remembered in local Singaporean war narratives as the Double Tenth Incident.
Disproportionate Benefits
None of the ships sunk or damaged had been warships but at the time the loss of seven transport ships was a critical blow to the already thinly stretched Japanese shipping, severely hampering its ability to keep up with its logistical demands. The more significant contribution of Operation Jaywick was psychological. Operation Jaywick challenged Japanese notions of supremacy in the region and their confidence to resist Allied incursions.
On the Allied front, the raid was considered a resounding success and had a galvanising effect on Allied morale at a time when their conventional options were limited. Traditionally, the measure of an asymmetric approach’s success is calculated by the degree to which it negatively impacts the enemy’s will to resist, and here the result was a net gain in morale for the Allies. However, in a protracted war, the ability to challenge the enemy’s will to resist is critical to winning the war, and the psychological impact inflicted on the enemy using asymmetric operations like Jaywick cannot be understated.
Strategic Considerations
However, as mentioned earlier, Operation Jaywick led to the Double Tenth Incident. Asymmetric operations typically require support and co-option from the local civilian population. Even if an operation did not involve the civilian population, regardless of the mission’s result, it was the civilian population that bear the brunt of enemy reprisals.
For non-state actors, they stand to gain a lot but lose very little, and this is likely the reason why asymmetric warfare is more readily used by non-state actors; civilian casualties do not matter so long as their political aims are achieved.
On the other hand, states considering the use of asymmetric operations need to be clear of the objectives, and their political and military leaders ready to accept, and justify, the use of such operations. This is because the fallout from asymmetric operations like Operation Jaywick can, and often does, echo long after a war.
Without any local intelligence, the Allies did not receive any information on the Double Tenth Incident and were therefore led to believe that Operation Jaywick could be repeated at the same locale. One year was spent preparing for Operation Rimau, a more complex and larger scale version of Operation Jaywick.
However, having been stung once, Japanese surveillance and patrols around Singapore and the Riau Islands were placed on high alert. Even though it placed a strain on Japanese military preparedness, it paid off when the Z Special Force returned in Oct 1944. None of 23 men involved in Operation Rimau survived the Japanese counter-offensive.
Asymmetric operations are heavily dependent on the element of surprise. The military maxim of not attacking the enemy at the same place twice must therefore guide the planning for future asymmetric operations.
Operation Jaywick is a good reminder of what asymmetric warfare can achieve when deployed alongside conventional operations. For military planners, the element of surprise gained to support a tactical operation, and the potential impact on civilian populations are of utmost importance. It is therefore timely to re-visit Operation Jaywick so that it can inform political and military leaders on the benefits and challenges of asymmetric warfare.
*John Kwok is a Research Fellow and Ian Li a Research Analyst with the Military Studies Programme at the S. Rajaratnam School of International Studies (RSIS), Nanyang Technological University (NTU), Singapore.